CREATING A VIGNETTE
Jim Doty, Jr Sometimes you can eliminate a distracting background by creating a vignette around your subject.There are several ways to do this in Photoshop and other image
processing programs. Here is one of them. The vignette color around the edges of your central image will be whatever color you have selected for the
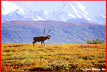
BACKGROUND in Photoshop. The default color is white. You can use the color picker to change the background to whatever color you want prior to starting the process below. In the example above, I chose a shade of blue
for the background.1) Choose the ELLIPTICAL MARQUEE tool and draw an oval shape around your subject. You have now "selected" your subject. 2) From the menu at the top, choose SELECT > INVERSE. This reverse your selection so you have selected everything but your subject.3) From the menu, choose SELECT
> FEATHER and choose a feather amount of around 20 to 40 pixels. This will soften the edge of the vignette. 4) Choose the ERASER tool and a large size brush and begin erasing your image. The
selected part will be erased, revealing the background color below. The non-selected central area (your primary image) will be protected from the eraser. If you forgot to do SELECT > INVERSE (step 2), the
center would be erased and the outer area protected. You now have a vignette! |